
Battle of Kambula
The warriors had not eaten in three days. Roughly twenty thousand of them came on toward the ridge at Kambula on 29 March 1879, many carrying Martini-Henry rifles stripped from British dead at Isandlwana two months before, where the Zulu had won one of the most stunning victories ever scored against a colonial army. They had every reason to expect another. What they met instead was an entrenched camp, a ring of locked wagons, and gun crews who knew exactly what canister shot does to a charging line at close range. By dusk the ground was carpeted with their dead, and a kingdom that had walked onto this plain certain of victory walked off it certain of nothing.
The Camp on the Ridge
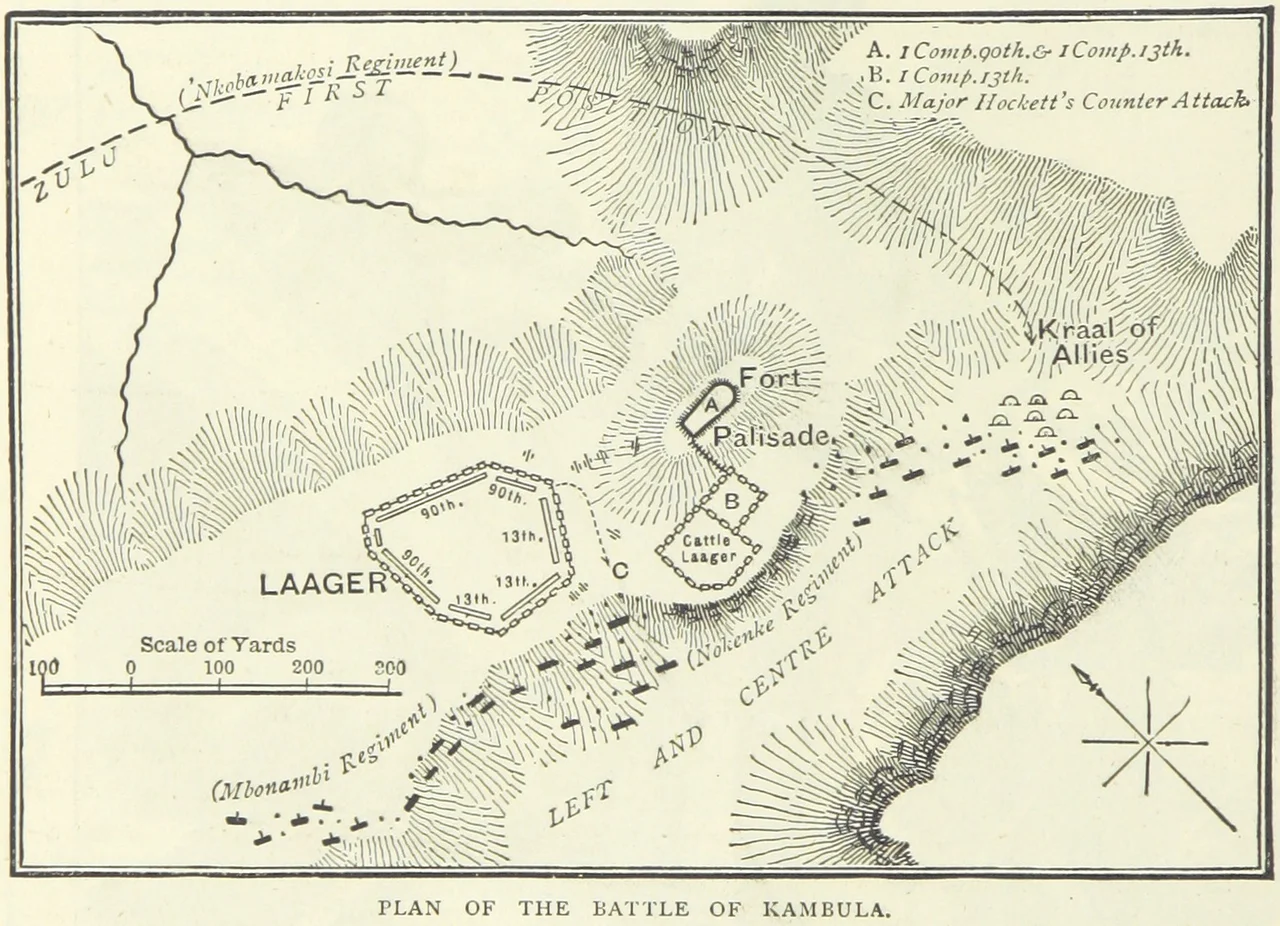
Colonel Evelyn Wood had built his position to be attacked. On a ridge stood a hexagonal laager of wagons chained tight, a separate kraal for the cattle, and a stone redoubt on a rise to the north. Trenches and earth parapets ringed it all. Six seven-pounder guns covered the approaches. His force came to about two thousand men. The day before, the Zulu had savaged his mounted troops at Hlobane, and Wood knew the full impi was now coming for him. When his scouts confirmed the army was on the move that morning, he did not panic. Confident his men could man the defenses in ninety seconds, he ordered them to finish their dinner first.
The Horns Close In
The Zulu came in the classic formation, the chest driving forward while two horns swept wide to envelop. Wood sent Redvers Buller's horsemen out to provoke the right horn early, before the whole army could strike together. The riders fired a volley and raced back, eleven thousand warriors roaring after them: "Don't run away, Johnnie! We want to speak to you." The trap worked. The right horn charged ahead of the rest and broke against disciplined volley fire and shell. Then the center and left horn poured into a ravine below the redoubt and surged out at the cattle kraal, fighting hand to hand until the British fell back to the redoubt. For a moment Zulu morale soared. Riflemen took the kraal walls and the huts beyond and turned the defenders' own fire against them.
Unwavering Courage, Unanswerable Guns
Wood ordered a counterattack. Two companies of the 90th Light Infantry, led by Major Hackett, fixed bayonets and charged across open ground to drive the warriors back over the ravine's lip. It worked perfectly, until Zulu marksmen in the surrounding huts opened on Hackett's flank. He took a blinding wound to the head, and forty-four of his men were killed or hurt before the recall. The Royal Artillery worked their guns in the open, pouring round after round into the right horn and shelling the riflemen out of the huts. Again and again the Zulu charged the perimeter, and the sources are unanimous that they did so with extraordinary courage. But the head of each charge was simply shot away. After hours of it, around mid-afternoon, the survivors began to fall back.
No Quarter
What followed was not a battle but a hunt. Wood loosed Buller with six hundred horsemen, and the pursuit toward Zunguin Nek became a slaughter. Mounted men fired from the saddle, clubbed warriors with their carbines, speared the exhausted with discarded assegais. One officer told his troopers to take no prisoners, calling out "remember yesterday" for the comrades lost at Hlobane. The British infantry and African auxiliaries combed the field afterward, killing the wounded where they lay. Only when a mist rose around the Zunguin mountains near dusk did the killing stop. Burial parties counted 785 Zulu bodies close to the camp; many more lay along the line of retreat, and historians estimate perhaps two thousand died in all. The British lost 18 killed and dozens wounded. The Zulu thought their losses here were worse than Isandlwana, and they were right to fear what it meant. The kingdom never recovered its belief in victory, and at Ulundi that July the war ended.
From the Air
Kambula lies at about 27.69 degrees south, 30.67 degrees east, on a ridge in the high grassland of northern KwaZulu-Natal, near Vryheid. From the air the terrain is open and rolling, the kind of ground that gave the Zulu no cover on their long approach. The nearest airfield is Vryheid (ICAO: FAVY), only a few kilometers off; Newcastle (ICAO: FANC) lies to the northwest, and Richards Bay (ICAO: FARB) is the nearest major airport. Visibility is generally excellent on the highveld, best in the dry winter months from May through August, when haze is minimal. A viewing altitude of 3,000 to 4,500 feet above ground frames the ridge and the line of the Zulu retreat toward the Zunguin range.
Nearby Stories
- Prince Imperial Memorial 21 km away
- Zulu Kingdom 41 km away
- Battle of Majuba Hill 44 km away
- Battlefields (KwaZulu-Natal) 53 km away
- Mpande kaSenzangakhona 70 km away
- Border Cave 82 km away
- Lobamba 117 km away
- Secunda CTL 143 km away