Battle of Sattelberg
The engineers had to be polite about it, but the problem was this: the Matilda II tank had never been designed for the terrain it was now expected to climb. Nobody in England in 1939 had sketched out a forty-five-degree gradient into kunai grass six feet high on a jungle mountain in New Guinea. Yet on 17 November 1943, three of those 27-ton infantry tanks began grinding their way up the Sattelberg Road, followed by Australians of the 2/48th Battalion, and over the next ten days they did what the planners said they could not. They climbed a mountain. The mission station at the top, an abandoned Lutheran church founded under German colonial rule in the nineteenth century, held 2,800 dug-in Japanese soldiers who had been waiting for them.
The Mountain That Mattered
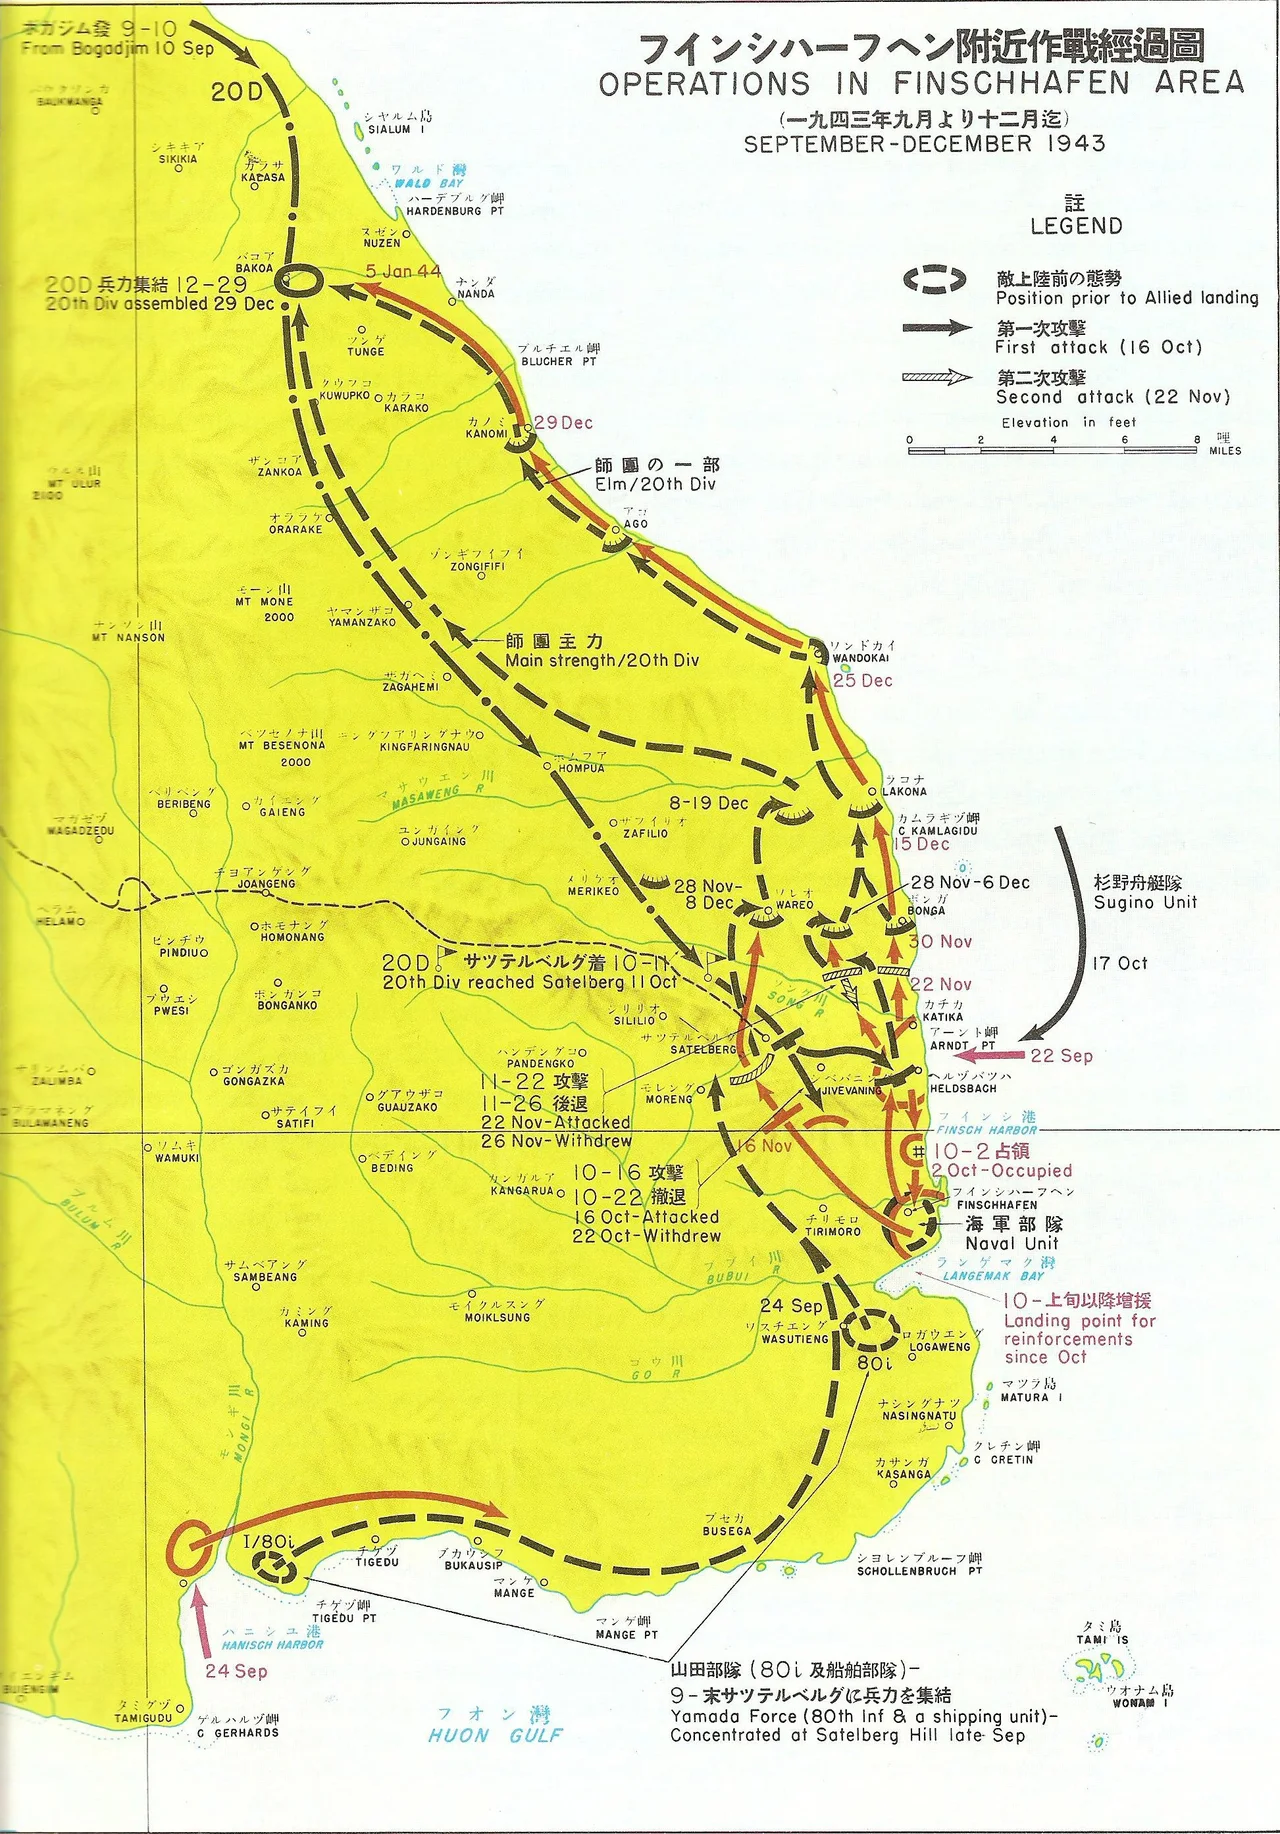
Sattelberg is a 900-meter peak about 8 kilometers inland from Finschhafen on the Huon Peninsula. Its German name comes from the Lutheran missionaries who built their station there in the late 1800s, when this was German New Guinea. In 1943 the old mission became a military prize for a single reason: altitude. Whoever sat on Sattelberg could see the entire Australian beachhead at Scarlet Beach, the coast road, and the approach to Finschhafen itself. When the Japanese 20th Division withdrew inland after the fall of Finschhafen in early October, they did so toward this height. From Sattelberg they launched the counterattack on Scarlet Beach on 16 October. Even after that attack failed, they still held the summit, and every Australian line of communication ran within observation range. Major General George Wootten decided the mountain had to come down, and the job went to the 26th Infantry Brigade under Brigadier David Whitehead.
The Tanks They Could Not Use
The Matildas arrived in theater from C Squadron of the 1st Tank Battalion. The Australians tried to keep their presence secret, parking them in cover and camouflaging them at Langemak Bay. Nobody had sent tanks up a jungle mountain before. Nobody had tested whether a Matilda could climb an unpaved track chewed to mud by the tropical wet season, or whether engineers could fill an anti-tank ditch fast enough under fire to let the column keep moving. The supporting artillery - 25-pounders from the 2/12th Field Regiment - could not even be dragged up the Sattelberg Road, so the 2nd Mountain Battery was substituted. No. 4 Squadron RAAF flew Wirraways and Boomerangs overhead to spot artillery targets. Vultee Vengeance dive bombers of No. 24 Squadron added strikes. The American 5th Air Force provided cover. But the sharp end of the attack was three tanks crawling up a mountain road, each one a slow-moving target for any Japanese soldier brave enough to approach with a satchel charge.
Ten Days of Slope
The first tank was disabled on day one by an improvised explosive device buried under the road. A second tank came up to support it, and Japanese sappers crept close enough to place a charge right in front of it. The blast did not kill the crew or knock the Matilda out, but it trapped them inside for the rest of the day, unable to open a hatch without being shot. Meanwhile the 2/48th Battalion was fighting across Coconut Ridge under machine gun, mortar, and grenade fire. By nightfall the Australians had killed at least 80 defenders and lost six of their own, with 26 wounded. The Japanese held the ridge overnight, then slipped away. Three replacement tanks came forward by morning. The disabled ones were repaired. The advance resumed - 250 meters a day, sometimes less, up gradients where every soldier carried their own supplies because the jeeps could not follow. The 2/24th and 2/23rd pushed on flanks through country so broken that even half-distance exhausted the men.
Tom Derrick and Ten Grenades
On the afternoon of 24 November, Sergeant Tom Derrick of the 2/48th Battalion led 11 Platoon up a kunai-covered escarpment toward the mission itself. The approach was brutal - a slope so steep it offered some concealment, but defenses around a red-roofed hut below the Lutheran church had been built into the hillside and survived the previous week of Allied air strikes. Derrick's platoon was pinned by machine-gun fire and grenades. As daylight faded, his company commander ordered him to withdraw so a fresh attempt could go in at dawn. Derrick did not refuse the order, exactly. He obfuscated. He stalled. And then he pushed his platoon forward through the fading light and attacked ten Japanese positions with hand grenades, his men backing him with Bren light machine guns and Owen submachine guns. The hut fell. The slope opened. The final push to the summit began. Derrick received the Victoria Cross for that night's work. He was the fourth soldier from the 2/48th Battalion to earn the award - by war's end, the 2/48th would be the most highly decorated Australian Army unit of the Second World War.
The Mission Empty at Dawn
On 25 November, Australian patrols entered the Sattelberg mission and found the defenders gone. The Japanese commander, Colonel Sadahiko Miyake, had been ordered by Lieutenant General Shigeru Katagiri to inflict maximum casualties, then withdraw north to Wareo. The defenders had already been reduced to a third of a normal daily ration. Artillery shells were nearly exhausted. A large number of Japanese bodies were found along the advance routes, and captured documents indicated that many of the survivors had been close to starvation. The 26th Brigade pushed on immediately, chasing the retreat across more jungle toward Wareo, which fell on 8 December. Five Australian units carried the battle honour "Sattelberg" afterward: 1st Tank Battalion, 2/23rd Battalion, 2/24th Battalion, 2/48th Battalion, and 2/2nd Machine Gun Battalion. The old Lutheran mission, abandoned before the war and fought over for ten days, sat quiet on its peak again, with the tanks parked on a road nobody had believed they could climb.
From the Air
Located at 6.49S, 147.77E on the ridgeline about 8 km inland from Finschhafen on the Huon Peninsula. Sattelberg sits at roughly 900 m above sea level - the Lutheran mission station is visible as cleared ground against the surrounding jungle ridges. Best viewed at 5,000-7,000 ft to take in the mountain's dominance over the coastal lowlands and Scarlet Beach. Nearest airfields: Finschhafen (AYFI) on the coast and Lae Nadzab (AYNZ) 80 km southwest. Morning light is best; afternoon cumulus typically wreathes the summit.
Nearby Stories
- Voco Point 34 km away
- Lae 49 km away
- Dampier Strait (Papua New Guinea) 73 km away
- Battle of Cape Gloucester 78 km away
- Battle of the Bismarck Sea 78 km away
- Japanese destroyer Ariake (1934) 108 km away
- Invasion of Buna–Gona 219 km away