Battle of Wareo
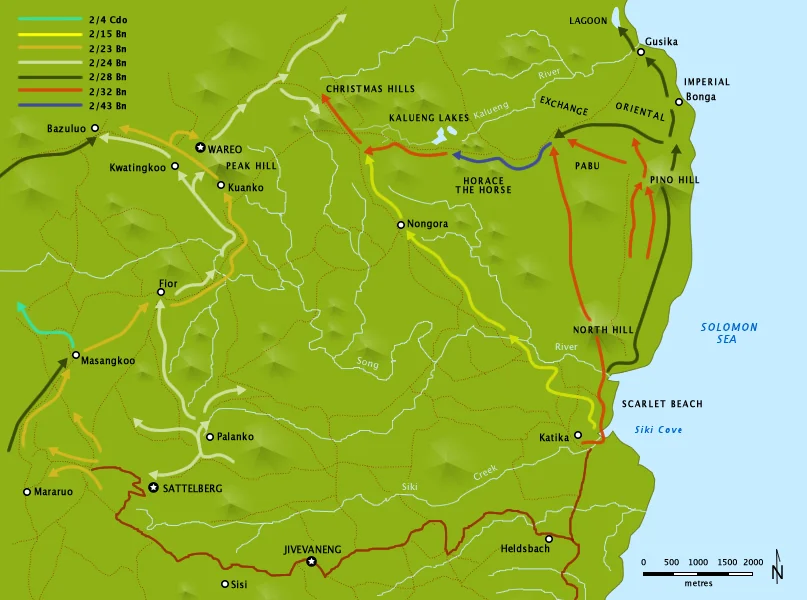
The junction tracks had pub names. Australian patrols from the 2/43rd Infantry Battalion, scouting north of Scarlet Beach in October 1943, mapped the trail system the Japanese used to move supplies inland and labeled the key crossings after hotels in Adelaide: Imperial, Oriental, Norfolk, Exchange. Somebody back home would have recognized every one of them. Somewhere out there in the jungle north of Finschhafen, reconnaissance platoons were trudging between trees and calling a muddy clearing "the Exchange" because it reminded them of a pub they could not sit in. It was a quiet kind of homesickness, the kind you fold into the work. The tracks became the geography of the Battle of Wareo.
After the Mountain
When Sattelberg fell on 25 November 1943, the next question wrote itself. A major air and naval base was already planned at Finschhafen - General Headquarters in the Southwest Pacific had decided this on 5 November - and the Japanese forces that had just been chased off the mountain had not disappeared. They had fallen back to the Wareo plateau, roughly 6,000 yards north on ground that gave them new observation over Scarlet Beach and the coast road. For General George Wootten's Australian 9th Division, the capture of Sattelberg had been a prerequisite, not a conclusion. The follow-up operation would be a three-pronged advance by a division of roughly 13,000 men. The 26th Brigade would push north from Sattelberg itself. The 24th would drive up the coast from Scarlet Beach through Bonga toward Gusika. The 20th would thread the middle from Nongora. The 4th Brigade would hold the beachhead. On paper it was a methodical sweep. On the ground it became a two-week grind through one of the most difficult tropical environments in the Pacific theater.
The Ninth Division Navy
Before any advance could proceed, the supplies had to get there. The American 2nd Engineer Special Brigade ran landing craft from Lae across rough water to Dreger Harbour and Langemak Bay - sheltered, though not yet finished as ports. The men called this flotilla the "9th Division Navy" because the brigade functioned as the division's private merchant marine. In October alone their boats made 3,870 trips, carried 5,930 troops and 26,573 long tons of cargo, and ran a supply route every other day. Larger landing craft brought up tanks and artillery but worked only in darkness because Japanese air attack was still a threat. Eight hundred men unloaded by day and another 800 by night. By 1 November, 12,000 rounds of 25-pounder ammunition were stockpiled around Finschhafen, and two more LCM loads were arriving every day. Jeeps carried supplies overland where tracks allowed. Where they did not, men carried them. Some New Guinean laborers were employed; most were unavailable, and Australian combat soldiers found themselves on carrying parties instead of patrols.
Pabu Hill
The Australian move that set up the whole advance was the occupation of Pabu Hill in mid-November. Three companies of the 2/32nd Infantry Battalion, under Major Bill Mollard, struck north of the Song River from the Australian position at North Hill, navigated past Japanese positions with the help of local scouts, slipped between "Exchange" and "Pino Hill," and took Pabu after a heavy bombardment from 25-pounders firing from Heldsbach Plantation. Pabu sat astride the Japanese supply line to Sattelberg. A small force there could cut the enemy's logistics. The Japanese commander, Lieutenant General Shigeru Katagiri, understood the threat immediately and diverted forces from the Finschhafen attacks to try to retake the position. On 22 November, he threw a strong force south along the coast track from Bonga against North Hill and Pabu. The Australian 2/43rd Infantry Battalion and 2/2nd Machine Gun Battalion held. At least 195 Japanese bodies were later counted around the 2/32nd's position. Australian losses there were 25 killed and 51 wounded. Katagiri's own superior, General Hatazo Adachi, later identified Pabu Hill as one of the decisive moments of the whole Huon Peninsula campaign.
Disease More Than Bullets
The three-pronged advance began on 27 November, the coastal drive led by the 2/28th Infantry Battalion with Matilda tanks and engineers. Early progress was unopposed. Then came the Kalueng River, and resistance. Artillery and mortars cleared one position; another stopped the advance at sunset. Two runners sent back for orders never made it - both were killed trying to cross contested ground. A patrol extricated itself after dark through rain to rejoin the battalion on the morning of 2 December. Further west, the 2/23rd pushed north from Masangkoo, and north of Sattelberg a distance that measured 6,000 yards on the map became roughly four times that in actual walking distance because of ridges, gorges, and jungle that turned any straight line into a serpentine crawl. But the harder enemy in this phase was not the Japanese. It was disease. Tropical illness - malaria, scrub typhus, dysentery - inflicted more Australian casualties than combat. The 2/28th was "plagued by sickness." The 2/43rd was "physically worn out." Patients moved from field aid posts to casualty clearing stations to the small Australian hospital ship Stradbroke II or the improvised American ship Norab. Air evacuation only became possible when the Finschhafen airstrip opened in December.
Wareo and the Road North
By the first week of December, Katagiri had seen enough. His troops were exhausted and hungry. Supplies were not arriving. He ordered the 79th and 80th Infantry Regiments to fall back north - the 79th toward Kalasa and Sio, the 80th east toward the coast. The 2nd Battalion of the 238th Infantry Regiment stayed behind to cover the withdrawal as a rearguard, holding until 15 December. Wareo fell to the Australians on 8 December 1943. Fighting did not end that day. On the same date, a company from the 2/24th Infantry Battalion was ambushed moving toward Bazuluo - eight Australians killed, four wounded. On 12 December, a pitched fight on a hill called the 2200 feature, about 1,700 yards northeast of Wareo, saw 27 Japanese and three Australians killed before the Australians took the ground. By II Corps Headquarters' tally for 26 November through 7 December, Japanese losses were 451 killed with 40 more found dead and one prisoner. Australian losses were 47 killed, 332 wounded. On 15 December the Allies landed at Arawe on New Britain, opening the next phase of Operation Cartwheel, while the 20th Infantry Brigade - rested during the Wareo advance - swept up the coast and took Sio in early January 1944, nearly unopposed. The Huon Peninsula was Allied ground. The tracks named for Adelaide pubs still ran through the jungle, rejoining the maps.
From the Air
Located at 6.45S, 147.78E on the Wareo plateau, about 10 km inland and slightly north of Sattelberg on the Huon Peninsula. The plateau provides views down to the coast at Gusika and Scarlet Beach. Best viewed at 4,000-6,000 ft to take in the full sweep from mountain ridges to coastal plain. Nearest airfields: Finschhafen (AYFI) about 15 km southeast, Lae Nadzab (AYNZ) 80 km southwest. Weather in the Huon interior is frequently overcast; clearest viewing is typically early morning before cumulus builds.
Nearby Stories
- Voco Point 34 km away
- Lae 49 km away
- Dampier Strait (Papua New Guinea) 73 km away
- Battle of Cape Gloucester 78 km away
- Battle of the Bismarck Sea 78 km away
- Japanese destroyer Ariake (1934) 108 km away
- Invasion of Buna–Gona 219 km away