Battle of Heligoland Bight (1914)
It was the kind of plan young officers dream up in the small hours over charts and brandy, and it almost did not get approved. Commodore Roger Keyes, who commanded Britain's long-range submarines at Harwich, and Commodore Reginald Tyrwhitt, who commanded the destroyer patrols there, had been watching German destroyers patrol the Heligoland Bight every night and come home every dawn. The Germans were so methodical you could set a watch by them. Keyes proposed the obvious response: take a superior force, slip across the North Sea in the dark, ambush the morning patrol, and run for home before the High Seas Fleet could come out to fight. Winston Churchill, then First Lord of the Admiralty, loved the daring of it. The Chief of Staff, Doveton Sturdee, hated the risk. The compromise that emerged on 28 August 1914 nearly turned into a catastrophe, and instead turned into the most lopsided British naval victory of the entire war.
A Plan Half-Approved
The First World War was three weeks old. The British Expeditionary Force had just crossed to France, the German army was driving through Belgium, and on the water the two greatest fleets in the world were sitting on their hands. The British Grand Fleet patrolled the northern North Sea from Scapa Flow. The German High Seas Fleet sat in the Jade and Elbe estuaries waiting for the British to come close enough to ambush. The Heligoland Bight, the sea inside Germany's front door, was guarded by destroyers and light cruisers on rotating patrols. Keyes and Tyrwhitt proposed to sail in there with 31 destroyers, two cruisers, and a screen of submarines, hit the patrol on its return leg, and leave before serious help could arrive. Admiral Sturdee approved a thinner version of the plan and refused to tell Admiral Sir John Jellicoe, commanding the Grand Fleet, that it was happening. Jellicoe found out on 26 August - two days before the raid - and immediately sent battlecruisers and light cruisers south to support, against Sturdee's wishes. That late reinforcement decided the battle.
Mist and Confusion
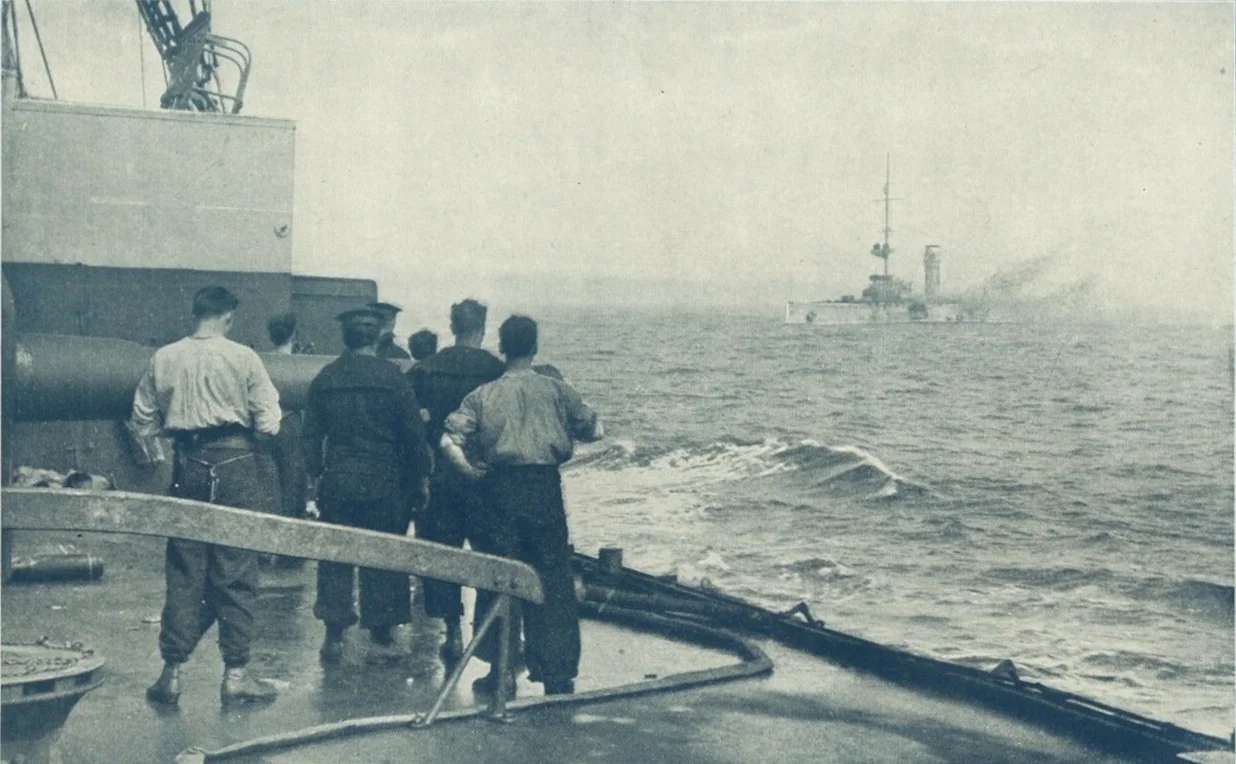
Visibility on the morning of 28 August was no more than three miles in places, and the engagement that followed was less a battle than a series of confused encounters between ships that could not see each other clearly enough to tell friend from enemy. At 07:00, Tyrwhitt's flagship Arethusa - brand new, with green crew and guns that jammed when fired - sighted the German torpedo boat G194. By 07:26 the British destroyers were chasing ten German destroyers east toward Heligoland. At 07:58 the light cruisers Stettin and Frauenlob arrived from Wilhelmshaven and the British had to fall back; Arethusa and Frauenlob fought a duel in which a British shell destroyed Frauenlob's bridge, killing thirty-seven men including her captain, before the damaged German cruiser turned for home. Arethusa took hits too, losing nine of her own men. By 08:15 a series of misidentifications had Roger Keyes chasing what he thought were German cruisers - they were British - and the British submarine E4 was almost firing torpedoes at Southampton, which tried to ram her in return. The whole engagement nearly turned into a self-inflicted disaster.
Three Cruisers Down
Rear Admiral Leberecht Maass, commanding the German destroyer squadron, did not yet understand the scale of what he was facing. He dispatched the light cruisers Coeln, Strassburg, Ariadne, and Mainz separately rather than in concentration, on the assumption that the British force was small. They were not small. Mainz blundered into Tyrwhitt's squadron at 11:30, took shells and a torpedo, and was scuttled by her captain at 12:20. Keyes brought the destroyer Lurcher alongside the sinking cruiser and rescued the crew personally - among them the son of Admiral Tirpitz, who would spend the rest of the war as a prisoner. Then at midday Vice Admiral David Beatty made the decision that defined the battle: with the tide rising fast enough to let German battlecruisers leave port, he took his five battlecruisers into the bight at maximum speed. Coeln, with Admiral Maass aboard, was the first he caught. His 12-inch and 13.5-inch guns disabled her in minutes. Ariadne came up next and met the same treatment, and was abandoned to sink. At 13:10 Beatty turned for home, passing Coeln on the way and finishing her with a final salvo.
The Cost
Around 1,200 German sailors died that day. Coeln went down with almost all hands - only a single survivor was picked up by a German ship two days later, out of about 250 men who had got off the ship into the water. Rear Admiral Maass died with her. Ariadne lost dozens; Mainz lost roughly a hundred. The destroyer V187 was sunk separately by British destroyers, with high casualties; the German light cruiser Frauenlob lost thirty-seven men on her bridge. Three German light cruisers and a destroyer were on the bottom; three more light cruisers and three torpedo boats were damaged. The British lost no ships. Thirty-five British sailors were killed, fifty-five wounded; one light cruiser and three destroyers were damaged. The disparity was real, but it was not exactly skill - it was geography, weight of metal when the battlecruisers arrived, and the German habit of feeding their cruisers into the fight one at a time. The British knew they had been lucky.
Cheering Crowds, Quiet Fleet
When Tyrwhitt's ships came back into Harwich, the dockside was packed with cheering crowds. Three German cruisers in a morning. Sailors decorated, captains photographed. David Beatty was hailed as the hero of the action, though he had taken little part in planning it and almost no part in the early fighting - the plan was Keyes and Tyrwhitt's, and Beatty had only arrived at the end. The deeper victory was strategic and silent. The Kaiser, badly shaken by losing three cruisers in his own front yard, ordered the High Seas Fleet to avoid risk: 'hold itself back and avoid actions which can lead to greater losses.' Admiral Tirpitz was furious. The German battle fleet would remain on a tight chain for months, and even when it eventually came out at Jutland in 1916 the Kaiser's caution shaped its tactics. A daring raid by destroyers and submarines, almost wrecked by its own bad communication, kept the High Seas Fleet bottled up for years. Few naval engagements have ever paid such a dividend.
From the Air
Located at 54.19 N, 7.51 E - the open water of the Heligoland Bight where the surface engagements took place, between Heligoland itself to the north and the Jade and Elbe estuaries to the south. The German base at Wilhelmshaven, where Frauenlob and other damaged cruisers limped home, sits forty-five kilometers south on the Jade. Cruising altitude of 6,000-10,000 feet on a clear day - the mist that defined the battle is more a winter feature - shows the basic geometry: Heligoland's red cliffs to the north, the Frisian island chain stretching west to Norderney, and the German coast at Cuxhaven and Wilhelmshaven to the south. Nearest airports: Heligoland (EDXH) on Düne island, Wilhelmshaven-Mariensiel (EDWI), Wangerooge (EDWG), and the larger hubs at Bremen (EDDW) and Hamburg (EDDH) inland.
Nearby Stories
- Amrumbank West 10 km away
- Alte Weser Lighthouse 12 km away
- MV Pallas 14 km away
- German Trawler V 1101 Preussen 16 km away
- Gode Wind Farm 20 km away
- Heligoland Bight 20 km away
- Juist 32 km away
- SM UB-22 38 km away